介绍几种组件开发常用的动画以及实现思路,这里主要是 react-hooks 的动画实现思路,没用 react-spring 等动画库,所以并不是最优解,对动画库熟练的话用库会更快一点。
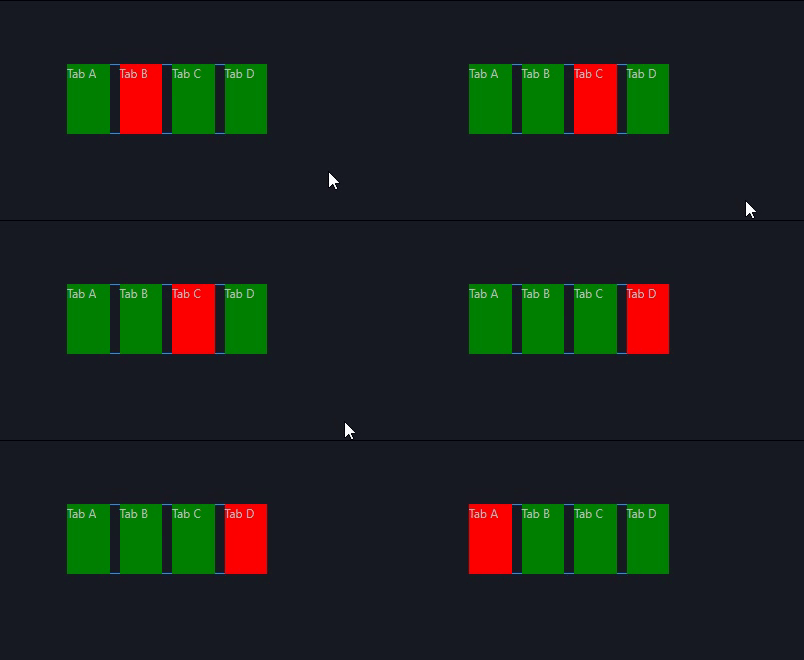
如上图所示,每隔一秒选项就会进行状态切换,这其中,状态的切换离不开useState这个hooks,而每隔一秒的过程可以有多种方式实现(setInterval, setTimeout, requestAnimationFrame, requestIdleCallback)。这里我们用requestAnimationFrame来实现,setInterval和setTimeout会在浏览器进入后台运行后依旧执行,浪费性能。
1.首先用useState创建一个index变量,用于记录当前选中的选项卡,默认为0(表示选中第一个)。再用useRef创建一个变量timer,用于记录计时器id。
2.创建一个启动动画的函数,startLoop,在startLoop中创建一个变量initTime,用于记录第一次执行动画的时间戳。
3.startLoop中再创建一个函数loop,这个函数将被作为requestAnimationFrame的回调函数,在每一帧浏览器渲染网页前被调用。requestAnimationFrame在执行回调函数loop时,会给loop传入一个时间戳参数(timeStamp),表示动画执行的时长(ms级)。
4.loop函数中,我们用timeStamp - initTime >= interval来判断是否需要切换状态,其中Interval为时间间隔(ms级)。切换状态时需要用setIndex的函数式参数,因为在react中,原生事件和异步函数中如果需要获取最新的状态值,需要用函数式参数的方式来获取,比如:setIndex( pre=>pre+1 ),其中pre就是最新的状态值。
5.在startLoop中执行loop函数,再创建一个useEffect,添加所需的依赖,执行startLoop。最后记得在useEffect中添加卸载函数,执行cancelAnimationFrame,用于清除对应的计时器。
{
  "data": [
    {
      "text": "Tab A"
    },
    {
      "text": "Tab B"
    },
    {
      "text": "Tab C"
    },
    {
      "text": "Tab D"
    }
  ],
  "fields": [
    {
      "name": "text",
      "value": "text",
      "desc": "文本"
    }
  ]
}
import React,{useState, useEffect, useRef} from "react";

export default function (props) {
  const { left, top, width, height, id, data } = props;

  const interval = 1000;    //轮播间隔,单位为ms

  const [index, setIndex] = useState(0);  //当前项下标
  const timer = useRef();   //计时器实例

  //初始化时启动轮播动画
  useEffect(()=>{
    startLoop();
    return ()=>{
      cancelAnimationFrame(timer.current)
    }
  },[]);

  // 样式
  const styles = {
    position: "absolute",left,top,width,height,
    display:"grid",
    gridTemplateColumns:`repeat(${data.length},1fr)`,
    columnGap:10
  };

  return (
    <div className="__easyv-component" style={styles} id={id}>
      {
        data.map((d,i)=>{
          return <div key={i} style={{
            background:i==index?"red":"green",
          }}>{d.text}</div>
        })
      }
    </div>
  );
  function startLoop(){
    let initTime;
    const loop=(timeStamp)=>{
      if(!initTime) initTime=timeStamp;
      if(timeStamp - initTime > interval){
        initTime += Math.floor((timeStamp-initTime)/interval)*interval;
        setIndex(pre=>(pre+1)%data.length);
      }
      timer.current = requestAnimationFrame(loop);
    }
    loop();
  }
}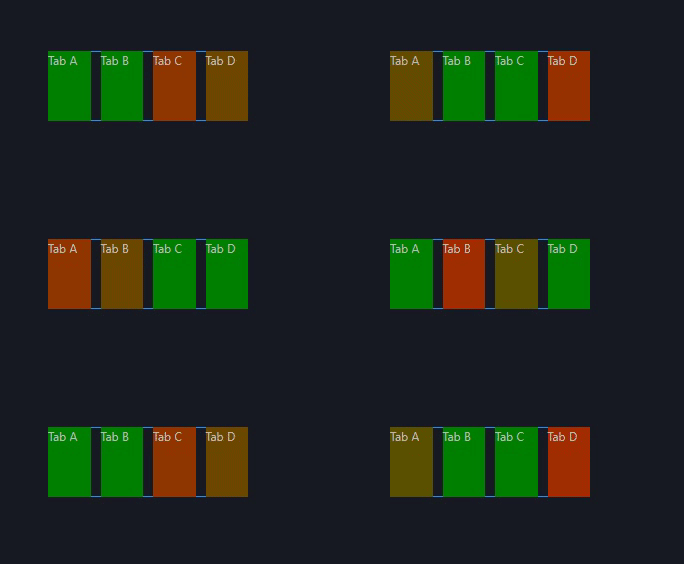
如上图所示,我们的选项卡在切换状态时,多了一个颜色渐变的过渡动画,这使得它看上去更加舒适。在前一个demo中,我们已经完成了轮播动画的效果,接下来我们将在其基础上,完成这个过渡动画。
import React,{useState, useEffect, useRef} from "react";

export default function (props) {
  const { left, top, width, height, id, data } = props;

  const interval = 1000;    //轮播间隔,单位为ms

  const [index, setIndex] = useState(0);  //当前项下标
  const timer = useRef();   //计时器实例

  //初始化时启动轮播动画
  useEffect(()=>{
    startLoop();
    return ()=>{
      cancelAnimationFrame(timer.current)
    }
  },[]);

  // 样式
  const styles = {
    position: "absolute",left,top,width,height,
    display:"grid",
    gridTemplateColumns:`repeat(${data.length},1fr)`,
    columnGap:10
  };

  return (
    <div className="__easyv-component" style={styles} id={id}>
      {
        data.map((d,i)=>{
          return <div key={i} style={{
            background:i==index?"red":"green",
            transition:"background 0.5s linear"
          }}>{d.text}</div>
        })
      }
    </div>
  );
  function startLoop(){
    let initTime;
    const loop=(timeStamp)=>{
      if(!initTime) initTime=timeStamp;
      if(timeStamp - initTime > interval){
        initTime += Math.floor((timeStamp-initTime)/interval)*interval;
        setIndex(pre=>(pre+1)%data.length);
      }
      timer.current = requestAnimationFrame(loop);
    }
    loop();
  }
}Animation、KeyframeEffect,chrome 75开始支持;
另外,animte 的隐式from/to关键帧在chrome 84支持,animte本身在chrome 36就支持了。
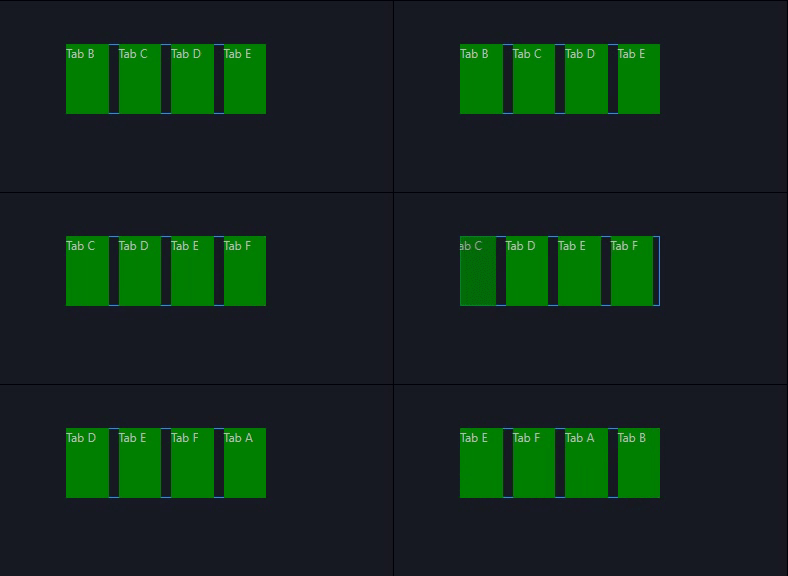
如上图所示,这次我们不再需要用 index 来记录当前选中项了,但是我们依旧需要 index 这个变量,用于记录数据的切割起点,当 index 变化时,我们需要截取数据中索引在 index——index+4 之间的数据,如果 index+4大于数据长度,就从头部截取一部分。
1.由于直接控制组件渲染的是截取后的数据,不再是 index了, 所以我们可以将 index 改为用useRef绑定,并重新创建一个状态 showData ,组件将根据 showData 来渲染。
2.每触发一次轮播动画,我们就需要做以下这些事情:
a.生成新的showData,这个showData比前一次渲染的showData多一条数据,但是起点相同,这样产生的效果就是在组件最右侧添加了一个新的选项,这个选项在画布外。
b.最左边的选项透明度会从1变成0 。
c.最右边新添加的选项透明度会从0变成1 。
d.所有选项都会整体向左偏移,偏移量为 一个选项宽度+一个间隔宽度。
e.所有动画结束后,更新 index 和 showData,showData 只需要4条数据就足够了。
3.如果我们用替换className,setTimeout等手段来完成淡入淡出的动画,是没办法保证 "更新 index 和 showData 的代码" 一定是在动画执行完毕后执行的,所以这里我们使用了 Animation API,用 Animation 创建的动画对象,可以添加 finish 事件,在动画完成时执行 onfinish 回调函数。另外,引入KeyframeEffect也为动态创建动画效果提供了便利,再也不需要在css中预置keyframes了。
import React,{useState, useEffect, useLayoutEffect, useRef} from "react";

export default function (props) {
  const { left, top, width, height, id, data } = props;
  const interval = 3000;    //轮播间隔,单位为ms
  const gap = 10;     //每一项之间的间距
  const count = 4;    //每次需要显示的项数
  const itemWidth = (width-gap*(count-1))/count;    //每项的宽度

  const index = useRef(0);  //当前项下标
  const timer = useRef();   //计时器实例
  const boxRef = useRef();  //容器实例,做平移动画

  const [showData, setShowData] = useState(data.length>count?[...data,...data].slice(index.current, index.current+count):data);  //需要显示的数据

  //初始化时启动轮播动画
  useEffect(()=>{
    data.length>count && startLoop();   //只有数据量大于每次显示的项数时才需要启动轮播动画
    return ()=>{
      cancelAnimationFrame(timer.current);
    }
  },[]);
  useLayoutEffect(()=>{
    const dom = boxRef.current;
    const child = dom.childNodes;
    //showData长度为5时,表示组件开始执行过渡动画
    if(showData.length==5){
      //平移动画
      const animation = new Animation(new KeyframeEffect(
        dom,
        [
          { transform:"translateX(0)" },
          { transform:`translateX(-${itemWidth+gap}px)` }
        ],
        { duration:500, fill:"backwards" }
      ),document.timeline);
      animation.play();
      //透明度变化动画
      child[0].animate({    //淡出
        opacity:[1,0],
        easing:["ease-out"]
      },500);
      child[child.length-1].animate({   //淡入
        opacity:[0,1],
        easing:["ease-in"]
      },500);
      animation.onfinish = (e)=>{
        index.current = (index.current+1)%data.length;
        setShowData([...data,...data].slice(index.current, index.current+count));
      }
    }
  },[showData]);

  // 样式
  const styles = {
    position: "absolute",left,top,width,height,
    overflowX:"hidden"
  };
  const boxStyle = {
    height:"100%",
    display:"flex",
    gap
  }

  return (
    <div className="__easyv-component" style={styles} id={id}>
      <div ref={boxRef} style={boxStyle}>
        {
          showData.map((d,i)=>{
            return <div key={i} style={{
              background:"green",
              minWidth:itemWidth
            }}>{d.text}</div>
          })
        }
      </div>
    </div>
  );
  /**开始动画 */
  function startLoop(){
    let initTime;
    const loop=(timeStamp)=>{
      if(!initTime) initTime=timeStamp;
      if(timeStamp - initTime > interval){
        initTime += Math.floor((timeStamp-initTime)/interval)*interval;
        setShowData([...data,...data].slice(index.current, index.current+count+1));
      }
      timer.current = requestAnimationFrame(loop);
    }
    loop();
  }
}上面三种动画效果对 requestAnimationFrame 的应用比较简单,只是将它作为了setInterval和setTimeout的替代品而已,接下来这个动画效果,将告诉你requestAnimationFrame是如何控制组件执行帧动画的。
IntersectionObserver, chrome 51开始支持。
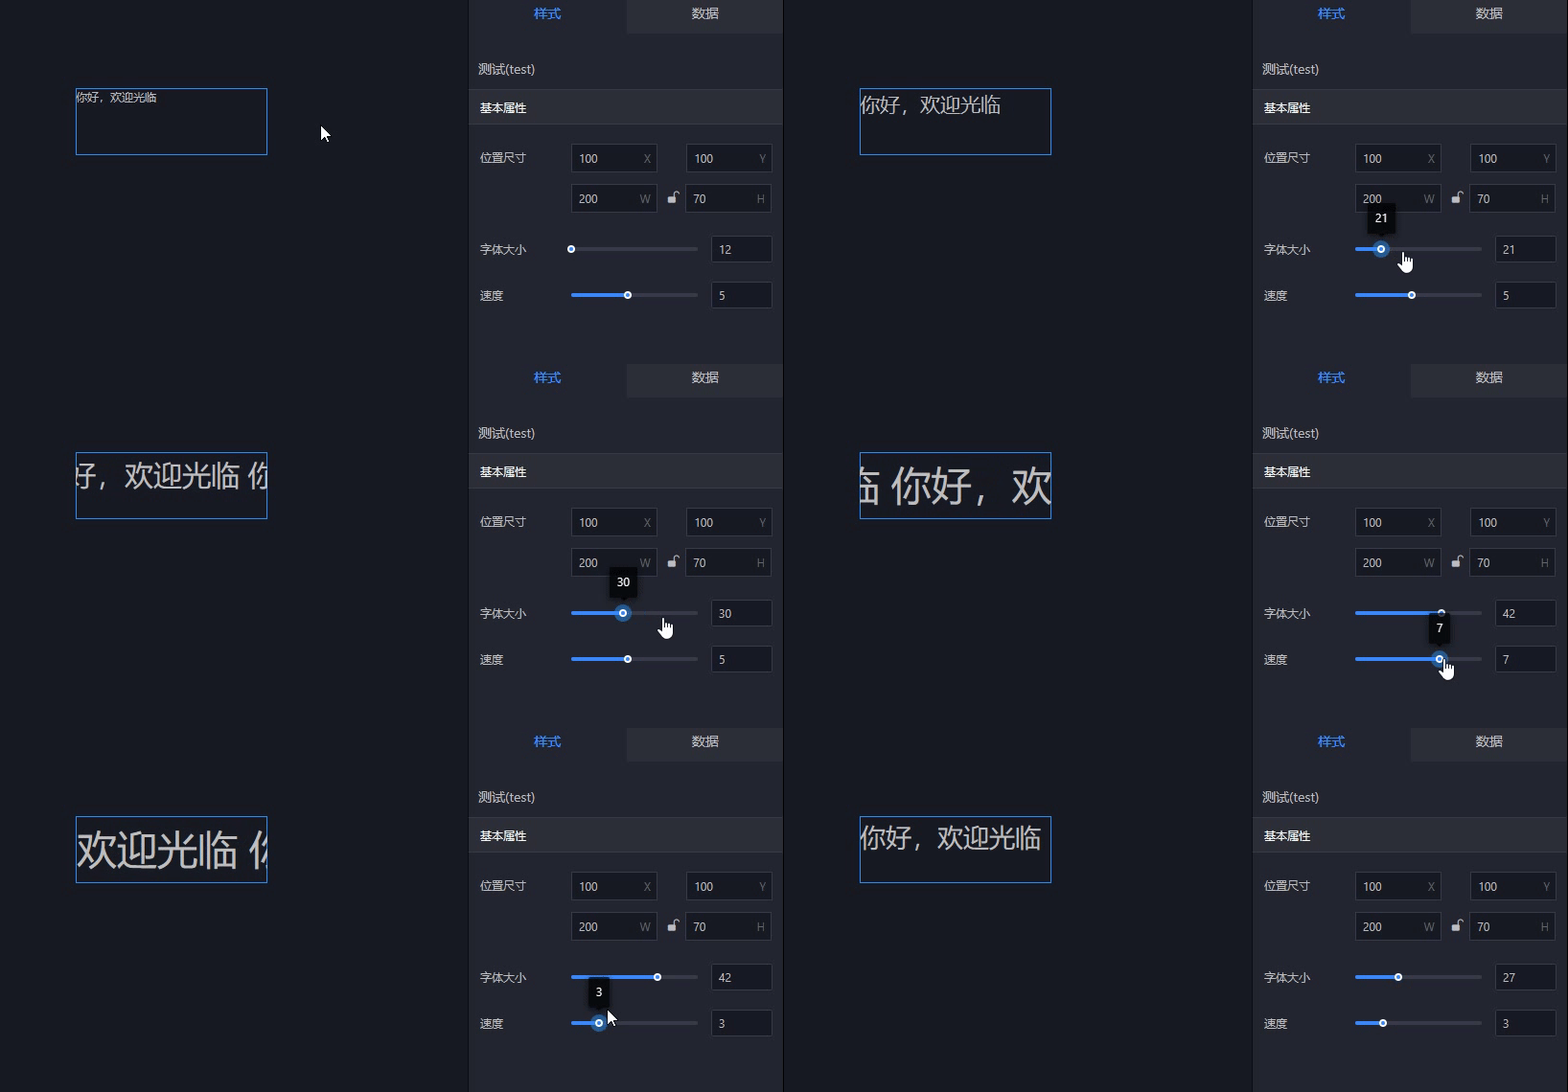
如图所示,当我调整组件的字体大小时,如果字体太大,导致文字溢出了,组件就会自动执行跑马灯动画。当我调整速度配置项时,跑马灯的速度也会相应的改变。
1.想要实现文字溢出时执行跑马灯动画的办法有很多,最简单粗暴的就是在某些配置项发生变化时,获取文字dom的真实宽度和组件宽度,两者进行对比,如果文字宽度>组件宽度,则执行跑马灯动画。不过这里有个问题,就是这个“某些配置项”是哪些呢?一般是指那些会导致文字宽度发生变化的配置项,比如字体大小、字体间距等等。但是这样的配置项太多了,我们不可能在useEffect的依赖里全部添加进去,所以这里我们选择plan B,利用IntersectionObserver来检测文字是否溢出。IntersectionObserver和requestAnimationFrame类似,他们都是异步且跟随浏览器刷新而执行的。
2.想要实现跑马灯效果需要创建两个一模一样的dom,当前面的dom逐渐消失在视野中时,紧随其后的dom会慢慢显示在窗口中,当前面的dom完全消失时,后面的dom会恰好出现在前面dom的初始位置,此时我们重置两个dom的位置,继续播放跑马灯动画,就可以达到连续不断的效果。而让两个dom能根据速度值同步移动,就需要requestAnimationFrame出手了,在requestAnimationFrame中,我们可以直接修改两个dom的transform值,来做到dom的移动效果。
3.速度配置项的变化会导致整个动画的速度产生变化,一般来讲,我们可能会创建一个拥有新速度的动画,然后把原有的动画暂停掉。不过对于跑马灯动画而言,我们只是在每一帧改变dom元素的偏移值,速度影响的不过是偏移值的变化速度,所以我们可以将速度绑定到useRef上,让动画在每一帧根据这个ref来修改dom的偏移值,这样就不需要重启动画了。
4.为了便于重复利用,我们可以将文字跑马灯效果封装成一个独立的组件,并提供一个传入ref的参数,传入的ref将绑定文本组件的根节点,这样父组件可以通过这个ref来控制文本节点,比如为其绑定一个点击事件。
{
  "base": {
    "name": "测试",
    "module_name": "test",
    "version": "1.0.0",
    "show": 1
  },
  "width": 200,
  "height": 70,
  "configuration": [
    {
      "name":"fontSize",
      "displayName":"字体大小",
      "type":"range",
      "value":12,
      "config":{
        "min":12,
        "max":56
      }
    },
    {
      "name":"speed",
      "displayName":"速度",
      "type":"range",
      "value":5,
      "config":{
        "min":1,
        "max":10
      }
    }
  ]
}
import React,{useState, useEffect, useRef, forwardRef} from "react";
export default function (props) {
const { left, top, width, height, id, configuration } = props;
const { fontSize, speed } = configuration;
const domRef = useRef(); //用于绑定子组件dom
// 样式
const styles = {
position: "absolute",left,top,width,height,
};
useEffect(()=>{
domRef.current.onclick=(e)=>{ //可以在父组件里操控子组件
console.log("???")
}
},[]);
return (
<div className="__easyv-component" style={styles} id={id}>
<Marquee
value="你好,欢迎光临"
speed={speed}
style={{fontSize}}
ref={domRef}></Marquee>
</div>
);
}
const Marquee = forwardRef((props, ref)=>{
const {
value, // 文本
style = {}, // 样式
speed = 5, // 动画速度
} = props;
const rootRef = ref || useRef(); //根节点dom,根节点的ref可以是父组件给的,这样可以在父组件上给子组件绑定事件,保证子组件代码不会被业务需求污染
const target = useRef(null); //观察对象dom
const observe = useRef(null); //观察器实例
const speed_ = useRef(0); //这里必须用一个ref绑定speed,否则animation中获取不到最新的speed
const timer = useRef(); //跑马灯计时器
const [overflow, setOverflow] = useState(false); //记录文字是否溢出
speed_.current = speed;
//开始跑马灯动画
const startAnimation = (lineWidth)=>{
const animation = (timestamp) => {
let frame = Math.round(((timestamp*speed_.current)%(lineWidth*100))/100);
target.current.style.transform = `translate(-${frame}px,0px)`;
target.current.nextSibling.style.transform = `translate(-${frame}px,0px)`;
timer.current = requestAnimationFrame(animation);
};
timer.current = requestAnimationFrame(animation);
}
useEffect(() => {
//初始化观察器,利用观察器来监视组件可视区域变化
observe.current = new IntersectionObserver(
function (entries) {
let entrie = entries[0];
if (entrie.boundingClientRect.width < entrie.rootBounds.width) {
//表示文字全部可视
cancelAnimationFrame(timer.current||0);
target.current.style.transform = "translate(0px,0px)"; //重置偏移
setOverflow(false);
return;
} else {
//否则文本溢出
if (!overflow) {
cancelAnimationFrame(timer.current || 0);
startAnimation(entrie.target.offsetWidth);
setOverflow(true);
}
}
},
{
root: rootRef.current,
threshold: new Array(101).fill(0).map((d, i) => i / 100), //这里设置了[0-1]之间所有的阈值,保证每一帧的变化都能被观察到
}
);
// start observing
observe.current.observe(target.current);
return () => {
cancelAnimationFrame(timer.current || 0);
observe.current.unobserve(target.current);
observe.current.disconnect();
};
}, []);
let textList = [value, value]; //创建两个一样的文本,用来制造跑马灯效果
return (
<div
style={{
width: "100%",
...style,
display: "flex",
whiteSpace: "nowrap",
overflow: "hidden",
justifyContent: overflow ? "start" : style.justifyContent || "",
}}
ref={rootRef}
>
{textList.map((item, i) => {
return (
<span
key={i}
ref={i == 0 ? target : null}
style={{ display: i == 1 && !overflow ? "none" : "inline" }}
>
{item}
{overflow && <span> </span>}
</span>
);
})}
</div>
);
})文章
11.87W+人气
19粉丝
1关注
 扫一扫关注公众号
 扫一扫联系客服
©Copyrights 2016-2022 杭州易知微科技有限公司 浙ICP备2021017017号-3  浙公网安备33011002011932号
互联网信息服务业务 合字B2-20220090
